An important part of Azure AI foundry is being able to access our models in external applications. Although this can be complex in some cases, we’re going to breakdown how to do it in a couple if line in python, and how to access the code in foundry.
Intro and getting started AI foundry
Video: Connecting to our model with python
Using your models
Python Requirements
If you have not installed python and would like to, you can do so using the link below:
https://www.python.org/downloads/You can also access all the code and a coding environment by clicking either the blue ‘Open in VS Code’ in the model details page or the ‘View code’ button in the model playground.
Requirements
We need 3 packages/ libraries to get our python code to interact with our model. At the moment of this courses creation, those packages are:
- Openai version 1.60.2
- azure-identity version 1.20.0
- ansible-core version 2.17.0
We’ll show below how these can be checked later on.
To install these packages, go into your command line of the computer you are using and type and hit enter on each line:
- pip install openai~=1.60.2
- pip install azure-identity~=1.20.0
- pip install ansible-core~=2.17.0
Once each package has installed, you can run the code in the section below
Python Code
Lets first import the custom azure package so we can connect to our model
# Import required packages

import os

from openai import AzureOpenAI
Let’s next setup the variables on our computer that will tell azure how to accesses our models which model to access.
# Set up Azure connection variables

endpoint = os.getenv("ENDPOINT_URL","https://your-resource.openai.azure.com/")

deployment = os.getenv("DEPLOYMENT_NAME","gpt-35-turbo-2")

subscription_key = os.getenv("AZURE_OPENAI_API_KEY","2cdfeaiomGSUHIOHfdniaIHCsACNipgfwnl452IH")
You will see across azure different endpoints and keys. To find the correct key, and endpoint, return to the model deployments menu and click get endpoints. A menu similar to the one below should appear.
The deployment variable is the way your code identifies which model in the list to use.
Next, we need to define our connection to our model.
# Create Azure OpenAI client

client = AzureOpenAI(

    azure_endpoint=endpoint,

    api_key=subscription_key,

    api_version="2025-01-01-preview"

)
This code creates our client connection, it doesn’t try to connect when we make it, but sets up the way we will send prompts to our model. Using the parameters above we need to pass it the endpoint, subscription key and API version.
Once we’ve created this template, we can set up the prompt. As well as sending our own prompt, we can also start a conversation with the model.
# Set up chat prompt and conversation history

chat_prompt = [

  {

    "role": "system",

    "content": "You are a helpful assistant.",

  }

  {

        "role": "user",

        "content": "I am going to Paris, what should I see?.",

      }
]
The last role and content block we send is what the LMM will respond to. The more messages we include will add to the context of the prompt. When we customise the message history in a model, we are ultimately telling our interface how previous messages to include like this.
Next let’s send our prompt to our model
# Send our prompt to the model

completion = client.chat.completions.create(

    model=deployment_name,

    messages=messages,

    max_tokens=800,

    temperature=0.7

    top_p=0.95

    frequency_penalty=0

    presence_penalty=0

    stop=None

    stream=0

)
After setting the prompt to a new variable, we can pass these to a function of our client template (object) we made earlier. We need to set the model, as well as all the parameters for the prompt listed in the previous image.
We can then print out our reply from the LLM.
# Convert the response as a JSON

print(completion.to_json())
We use the ‘to_json()’ function to get our data in the JSON (java script object notation) format as the reply form the LLM is not just the output. It contains a multitude of other information which you can use on your applications side.
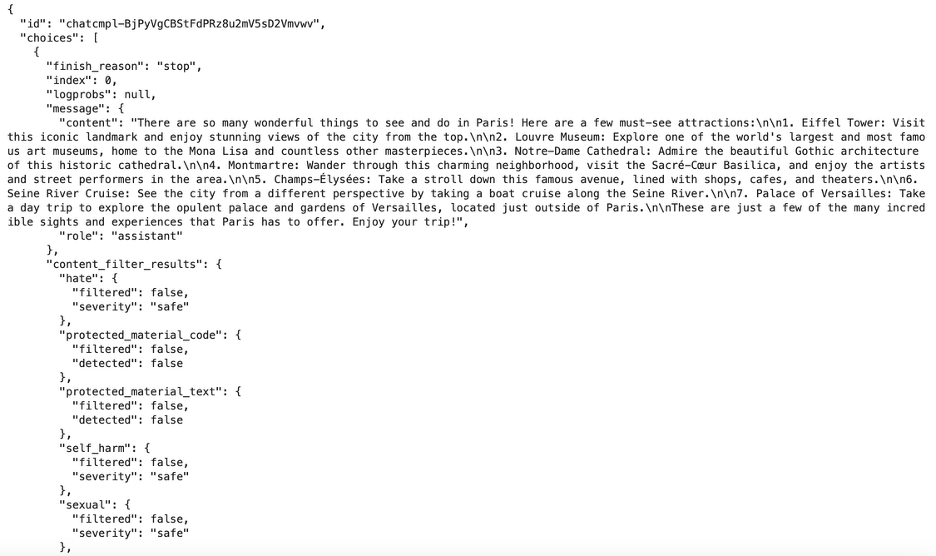
Complete JSON response structure from the AI model including metadata
Above is an example of the full response from an LLM.